
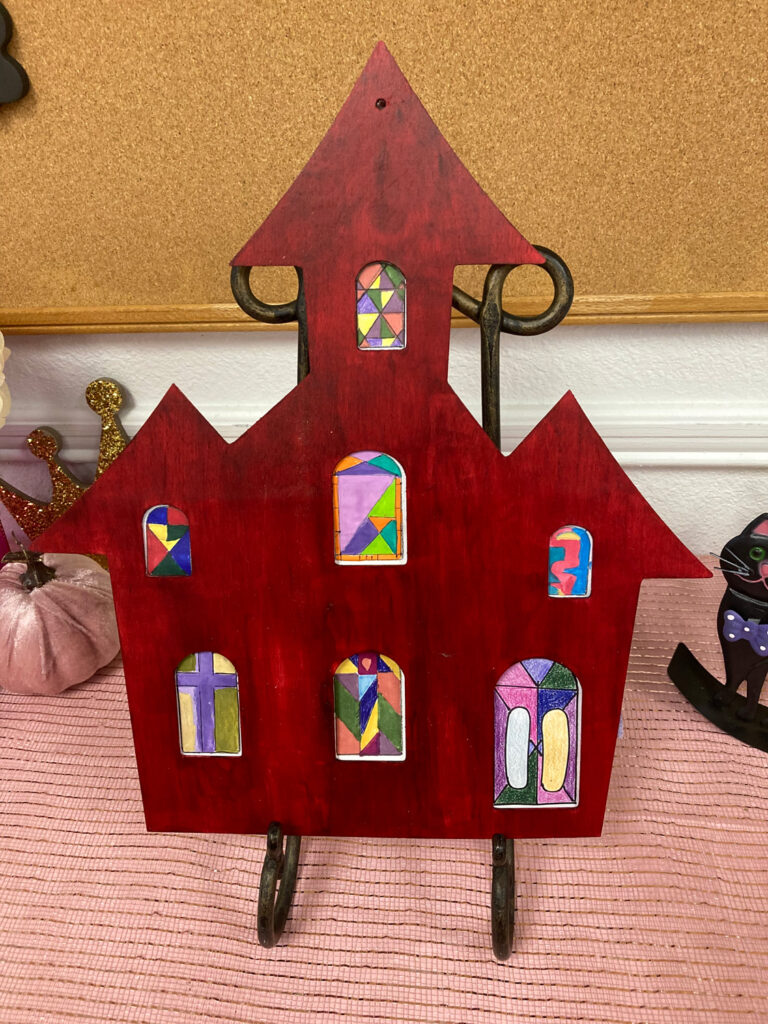
I volunteer with 3rd - 6th grade crafts on Wednesday nights at church. Our first project of the 2023-2024 school year was this wooden church craft with paper "stained glass" windows!
You will need:
- Unfinished wooden church cutouts
- Mod Podge Matte Clear Acrylic Sealer
- Acrylic paint
- Paint brushes / sponges
- Paper
- Pencil
- Rulers
- Colored pencils (markers or crayons could also work, but colored pencils seemed to look best.)
- Large sheets of paper or tarp to avoid paint getting on the table/floors
Note: This project did end up being more time consuming than expected. We hoped the kids could finish it in two 20-minute classes, but kids most ended up taking 3-4 classes.
How to make this wooden church craft and the stained glass paper windows
1. Preparing the churches for paint
It took a lot of paint to cover the absorbent wood of our example church. We sprayed some Mod Podge Matte Clear Acrylic Sealer on each of the remaining churches and gave them a few minutes to dry (and air out) before the kids started painting.
2. Tracing the windows
Each kid was instructed to grab a sheet of white paper and trace the windows so they would know how big to make their stained glass windows. We made sure everybody had the big door in the lower right since I only sprayed one side with Mod Podge.
3. Painting - Now it's getting fun!
This step is more time-consuming than it sounds! Each kid got to pick 1 color of acrylic paint to use on their church. They did have to pay extra attention to making sure the edges of the building and the windows were painted. We put down a large piece of paper for the churches to dry in the corner of the room.
Pro tip: tell the kids to quickly write their names on the back of their church BEFORE they begin painting. We forgot this step with the first few kids and ended up writing names on a paper next to each church when they set it aside to dry.
4. Designing the stained glass windows and door
Some kids finished this one in a few minutes. Others spent multiple classes perfecting their designs. Each child was given a ruler and a pencil to draw lines in their stained class window.
5. Coloring the stained glass windows and door
The kids who used colored pencil to color in the sections of their stained glass windows got better results than those who used markers.
6. Finishing the project
We supervised each kid as they cut out their windows (leaving a large margin for glue) and glued them in place on back of their church. Then we tied on a ribbon and reminded the kids to set them aside so the glue could dry in their next class.
Highly recommended!
The end result was an array of boldly colored, beautiful wooden churches, each with unique designs that let us get to know each kid a little better as we talked to them while they worked! The kids were truly excited about this project, telling us where they or their parents were going to put them when they got home.
What if you can't find the cutouts for this wooden church craft project?
The teacher found these cutouts at our local Dollar Tree. I think they were actually marketed as haunted house cutouts. I am unable to find them online, but you may be able to find other suitable cutouts with search terms like "wooden church cutout", "wooden haunted house cutout", or "wooden castle cutout."
These were larger than a sheet of paper. Something smaller might still be fun but less time-consuming.
You may also be able to cut something out of paper. - But I will say, if you have the budget and can find the wooden cutouts, I think they are worth it for a memorable project the kids will be proud to take home.

0 Comments